
Has your golf cart or LSV ever left you stranded when you needed it most? Losing power, slowing down, or even coming to a complete halt on an incline can be frustrating, inconvenient, and even leave you in a tough spot. Whether you’re navigating a hilly golf course, a sloping community road, or just pulling out of your driveway, a loss of uphill power is a clear sign that something isn’t right with your vehicle.
You’re not alone if you’ve faced this issue. Many golf cart owners find themselves scratching their heads when their trusty ride struggles with inclines. But what’s the root cause? Is it a battery problem, an engine issue, or something else entirely?
At gmtlsv.com, we’re committed to helping you understand and resolve these common challenges. This guide is designed to be your most comprehensive, in-depth, and authoritative resource for diagnosing and fixing uphill power loss in golf carts and LSVs. We’ll break down every potential cause for both electric and gas models, providing detailed symptoms, step-by-step troubleshooting, DIY repair solutions, and clear indicators for when it’s time to call in the professionals.
By the end of this article, you’ll be able to:
- Accurately identify the symptoms and underlying causes of power loss.
- Master basic troubleshooting techniques to pinpoint problems.
- Understand preventative maintenance to avoid future issues.
- Know exactly when to seek expert help for complex repairs.

1. Understanding Golf Cart Dynamics: Why Hills Are a Challenge
Before we dive into specific issues, let’s briefly understand how golf carts work and why inclines present a unique challenge to their power systems.
How Golf Carts Work: A Quick Overview
- Electric Golf Carts: These vehicles convert stored electrical energy into mechanical motion. The journey starts with the batteries, which supply DC power to the controller. The controller acts as the brain, regulating the flow of power to the electric motor based on your throttle input. The motor then drives the wheels, usually through a transaxle (a combination of transmission and axle).
- Gas Golf Carts: These operate much like miniature cars. Fuel from the fuel tank is sent via a fuel pump to the carburetor (or fuel injection system), where it mixes with air. This mixture is then ignited in the engine’s cylinders, creating combustion that drives the pistons. The engine’s power is transferred through clutches (drive and driven) to a drive shaft and then to the wheels.
The Physics of Uphill Driving
Climbing a hill puts significant strain on any vehicle’s power system. Here’s why:
- Overcoming Gravity: The most obvious challenge. You’re constantly fighting against the pull of gravity, which requires substantially more power output from the motor/engine compared to driving on flat ground.
- Increased Load: Any passengers or cargo add to the vehicle’s total weight, further increasing the demand on the power system when going uphill.
- Efficiency Loss: Under heavy load, components like the transaxle, clutches, or electrical connections can experience reduced efficiency, leading to power dissipation as heat rather than kinetic energy.
Understanding these basic principles helps in diagnosing why your golf cart might be struggling. The power system—be it electrical or mechanical—must work harder and be in peak condition to overcome these forces effectively.
2. Common Causes & Diagnostics for Electric Golf Cart Uphill Power Loss
Most modern golf carts are electric, making battery and electrical system issues the most frequent culprits for uphill power loss. Let’s break down the common problems and how to diagnose them.
A. Battery System Issues (Most Common & Highest Priority)
The batteries are the heart of an electric golf cart’s power. Any weakness here will immediately manifest as performance issues, especially on inclines.
- Low State of Charge (SoC):
- Symptoms: Your cart loses power relatively quickly after starting, feels sluggish even on slight inclines, or shows a low reading on its battery meter.
- Diagnosis: Fully charge your golf cart. Use a multimeter to measure the total battery pack voltage. A fully charged 48V system should read around 50.9V (6x 8.48V for 8V batteries) or 50.9V (6x 8.48V for 8V batteries), 38.2V (6x 6.37V for 6V batteries). A reading significantly below this, even after a supposed full charge, indicates a problem.
- Solution: Ensure your charger is working correctly and allow for a full, uninterrupted charge cycle. If the issue persists, the problem may be deeper than just low SoC.
- Old/Weak Batteries:
- Symptoms: Even after a full charge, your cart quickly loses power, has significantly reduced range, or individual batteries may show signs of bulging, white/green powdery corrosion on terminals, or low electrolyte levels.
- Diagnosis:
- Voltage Drop Under Load: Connect a voltmeter to the entire battery pack. Drive the cart uphill or apply the brakes while pressing the throttle (briefly and safely) to create a load. A significant voltage drop (more than a few volts) indicates weak batteries.
- Individual Battery Voltage: Measure the voltage of each individual battery in the pack. Even if the total pack voltage seems okay, one weak battery can drag down the performance of the entire system. Look for batteries that read significantly lower than others (e.g., in a 6x8V system, if most are 8.2V but one is 7.5V).
- Hydrometer Test (for Lead-Acid Batteries): Use a battery hydrometer to check the specific gravity of the electrolyte in each cell of each battery. Consistent low readings across all cells, or a significant difference between cells, indicates a weak battery.
- Solution: Replace the entire battery pack. Replacing only one or two weak batteries in an old pack is a temporary fix as the new batteries will quickly degrade trying to compensate for the older ones.
- Poor Battery Connections / Corrosion:
- Symptoms: Battery terminals or cables feel hot to the touch after driving, you might see sparks, or there’s visible white/blue corrosion on the terminals. This resistance reduces power flow.
- Diagnosis: Visually inspect all battery cables and terminals for corrosion, looseness, or damage. Feel the terminals and cables after a drive to check for excessive heat.
- Solution: Disconnect the batteries (negative terminal first!), clean all corrosion using a wire brush and a baking soda/water mixture, then rinse and dry thoroughly. Ensure all connections are tight. Apply a thin layer of battery terminal protector. Replace any damaged or corroded cables.
- Faulty Battery Charger:
- Symptoms: Batteries never seem to get a full charge, the charger’s indicator lights behave unusually, or the charger itself feels excessively hot during charging.
- Diagnosis: Measure the output voltage of the charger while it’s connected and attempting to charge the batteries. Compare this to the expected charging voltage. Listen for the charger’s fan (if equipped) to ensure it’s running. Try a different, known-good charger if available.
- Solution: Repair or replace the battery charger.
- Low Electrolyte Levels (Specific to Lead-Acid Batteries):
- Symptoms: Reduced battery lifespan, excessive heat during charging, or a battery hydrometer test showing low specific gravity.
- Diagnosis: Carefully remove the battery caps and visually inspect the electrolyte level in each cell. The fluid should cover the lead plates by about 1/4 to 1/2 inch.
- Solution: ONLY add distilled water (never tap water or battery acid) to bring the levels up. Do this after charging the batteries.
- Mismatched Battery Pack:
- Symptoms: Even with new batteries, performance is subpar, or one or two batteries seem to fail prematurely.
- Diagnosis: This often happens if individual batteries are replaced without replacing the whole pack, leading to an imbalance. Test individual battery voltages under load to confirm.
- Solution: Replace the entire battery pack with a new, matching set to ensure consistent performance and longevity.
B. Electric Motor Problems
The motor translates electrical energy into mechanical force. If it’s struggling, uphill performance will suffer.
- Worn Motor Brushes (DC Motors Only):
- Symptoms: Reduced speed and power, intermittent cutting out, excessive motor noise (e.g., whining, grinding), or motor overheating.
- Diagnosis: Requires removing the motor end cap to visually inspect the carbon brushes. They should be long enough to make good contact with the commutator. If they are very short or chipped, they’re worn.
- Solution: Replace the motor brushes. This is a common and relatively inexpensive repair.
- Motor Overheating:
- Symptoms: The motor casing feels excessively hot to the touch (can even burn you), a burning smell (like scorched plastic or insulation), or the cart simply cuts out as the motor’s thermal protection engages.
- Diagnosis: Touch the motor after it loses power. Check if cooling fins are clogged with dirt or debris, hindering heat dissipation.
- Solution: Allow the motor to cool down. Check and clean any obstructions around the motor for proper ventilation. Avoid prolonged uphill driving or excessive loads. If overheating is chronic, it could indicate internal motor damage or a controller issue.
- Internal Motor Damage (Armature, Field Coils, Commutator):
- Symptoms: Motor makes unusual grinding or squealing noises, fails to turn at all, or operates very inefficiently with severe power loss.
- Diagnosis: Often requires specialized tools and expertise (e.g., an armature growler test) to diagnose internal shorts or open circuits.
- Solution: Motor repair or replacement. This is typically a job for a professional.
C. Controller Unit Malfunctions
The controller is the “brain” of an electric golf cart. It regulates power delivery from the batteries to the motor.
- Overheating Controller:
- Symptoms: The controller’s heat sink feels excessively hot, the cart experiences intermittent power loss (especially on hills), or the cart might go into a “limp mode” where it severely limits power.
- Diagnosis: Feel the controller’s heat sink after a power loss. Check for proper ventilation around the controller; ensure cooling fins aren’t blocked by dirt or debris.
- Solution: Allow the controller to cool. Clean any debris from the heat sink. Ensure sufficient airflow around the controller. Avoid prolonged heavy loads.
- Internal Controller Failure:
- Symptoms: The cart completely loses power, operates only at very low speeds, or the controller shows no signs of life. Sometimes, there are no visible external symptoms other than lack of power.
- Diagnosis: Many modern controllers have diagnostic lights or codes. Consult your cart’s manual for interpreting these. Often requires a specialized diagnostic tool to confirm internal component failure.
- Solution: Controller repair (rarely feasible) or replacement.
- Faulty Solenoid:
- Symptoms: You hear a distinct “click” when you press the accelerator pedal, but the cart doesn’t move or only gets intermittent power. Or, there’s no click at all. The solenoid acts as a large electrical switch.
- Diagnosis: With the cart safely jacked up (wheels off the ground) and power disconnected, use a multimeter to test for continuity across the large terminals when the key is on and the pedal is pressed. Alternatively, check for voltage drop across the large terminals under load. If it clicks but no power, it might be clicking but not making internal contact.
- Solution: Replace the solenoid.
- Throttle Position Sensor (TPS) / Potentiometer / Inductive Throttle Sensor (ITS) Issues:
- Symptoms: Inconsistent power delivery, jerky acceleration, sudden power loss or surges, or inability to reach full speed. This sensor tells the controller how much power to send based on how far you press the pedal.
- Diagnosis: Requires measuring the voltage output from the sensor as the throttle pedal is depressed. The voltage should increase smoothly and consistently. Any jumps or dead spots indicate a faulty sensor.
- Solution: Clean or replace the throttle sensor.
D. Wiring & Electrical Connections
Even perfect components won’t work if the power can’t get to them.
- Loose or Corroded Wires/Terminals:
- Symptoms: Intermittent electrical issues, hot wires/terminals, voltage drops across connections, or visible damage to insulation.
- Diagnosis: Visually inspect all major power cables – especially battery cables, motor connections, and controller connections. Wiggle them gently to see if power flickers.
- Solution: Clean corrosion, tighten all connections, and replace any wires with damaged insulation.
- Damaged Wiring Harness:
- Symptoms: Random electrical failures, difficulty in pinpointing the issue to a single component, or visible signs of chewed wires (from rodents), cuts, or abrasions.
- Diagnosis: Thoroughly inspect the entire wiring harness for physical damage.
- Solution: Repair damaged sections of the harness or replace the entire harness if damage is extensive.
- Blown Fuses/Tripped Circuit Breakers:
- Symptoms: Complete loss of power to certain systems (e.g., lights, or the entire cart), or the cart simply won’t turn on.
- Diagnosis: Visually inspect all fuses for a broken filament. Check circuit breakers to see if they’ve tripped (usually a small button will pop out).
- Solution: Replace blown fuses with new ones of the correct amperage. Reset tripped circuit breakers. Crucially, identify and fix the underlying cause of the fuse blowing or breaker tripping, as they are safety devices indicating an overload or short circuit.
3. Common Causes & Diagnostics for Gas Golf Cart Uphill Power Loss
For gas-powered golf carts, uphill power loss typically points to issues with the fuel system, engine performance, or the drive (clutch) system.
A. Fuel System Issues
The engine needs a steady, clean supply of fuel to produce power.
- Clogged Fuel Filter:
- Symptoms: Engine sputters, starves for fuel under load (like going uphill), hesitates, or has difficulty starting.
- Diagnosis: Inspect the fuel filter; if it’s opaque, check for visible debris. Try disconnecting the fuel line after the filter and seeing if fuel flows freely (safely, into a container).
- Solution: Replace the fuel filter. This is a common maintenance item.
- Dirty Carburetor / Fuel Injection System Malfunction:
- Symptoms: Rough idling, poor acceleration, increased fuel consumption, engine backfiring, or a strong smell of unburnt fuel. A dirty carburetor cannot properly mix fuel and air.
- Diagnosis: Look for visible fuel leaks around the carburetor. If your cart has a fuel injection system, diagnostic codes may appear.
- Solution: Clean the carburetor (carburetor cleaner kits are available) or consider rebuilding it. For fuel injection systems, professional cleaning or replacement of injectors may be needed.
- Faulty Fuel Pump:
- Symptoms: Engine has difficulty starting or won’t start at all, dies unexpectedly while driving, especially on hills, as it cannot supply enough fuel under demand.
- Diagnosis: Check for proper fuel flow from the pump by disconnecting the fuel line to the carburetor and cranking the engine (safely). You should see a steady stream of fuel.
- Solution: Replace the fuel pump.
- Stale / Contaminated Fuel:
- Symptoms: Engine runs rough, lacks power, may have an unusual exhaust smell, or has difficulty starting after a long period of inactivity. Fuel can degrade and absorb water over time.
- Diagnosis: Visually inspect the fuel in the tank for discoloration, cloudiness, or visible water/debris.
- Solution: Drain the old fuel, flush the fuel system, and refill with fresh, high-quality fuel. Consider adding a fuel stabilizer if the cart will be stored for extended periods.
- Clogged Fuel Lines:
- Symptoms: Similar to a clogged fuel filter – intermittent power loss, engine sputtering, especially under load.
- Diagnosis: Inspect fuel lines for kinks, blockages, or cracks.
- Solution: Clear or replace clogged or damaged fuel lines.
B. Engine Performance Problems
A healthy engine is essential for consistent power output.
- Worn or Fouled Spark Plug:
- Symptoms: Hard starting, rough idle, misfires, reduced power (especially uphill), and increased fuel consumption.
- Diagnosis: Remove the spark plug and inspect its condition. Look for excessive carbon buildup, oil fouling, or worn electrodes. Check the plug gap.
- Solution: Clean or replace the spark plug. This is often an inexpensive and effective fix.
- Clogged Air Filter:
- Symptoms: Engine struggles to breathe, leading to reduced power, increased fuel consumption, and potentially black smoke from the exhaust.
- Diagnosis: Visually inspect the air filter element. It should be relatively clean. If it’s dirty, dark, or clogged with debris, it’s restricting airflow.
- Solution: Clean or replace the air filter.
- Low Engine Compression:
- Symptoms: Significant loss of power, difficulty starting, excessive engine noise, or blue/white smoke from the exhaust. This indicates worn piston rings, valves, or a damaged cylinder head gasket.
- Diagnosis: Requires a compression tester to measure the compression in each cylinder. Readings significantly below the manufacturer’s specifications are problematic.
- Solution: This requires professional engine repair, potentially involving piston rings, valves, or cylinder head work.
- Incorrect Valve Clearance:
- Symptoms: Engine ticking noises, reduced power, hard starting.
- Diagnosis: Requires specialized tools and knowledge to measure and adjust valve clearances.
- Solution: Adjust valve clearances according to manufacturer specifications. This is typically a professional job.
- Restricted Exhaust System (Clogged Muffler):
- Symptoms: Engine lacks power, particularly under load, feels “choked,” and may run hotter than usual.
- Diagnosis: Check for unusual exhaust smells or sounds. A partially clogged muffler creates back pressure, preventing the engine from expelling exhaust gases efficiently.
- Solution: Clear or replace the muffler/exhaust pipe.
C. Drive System Issues (Clutches/Belts)
The drive system transmits power from the engine to the wheels. Slippage or malfunction here means lost power.
- Worn or Loose Drive Belt (Clutch Belt):
- Symptoms: Engine revs high but the cart moves slowly, especially on inclines. You might hear a squealing sound (belt slippage).
- Diagnosis: Visually inspect the drive belt for cracks, fraying, or excessive looseness. It should be taut.
- Solution: Replace the drive belt. Ensure it’s the correct size and tension for your model.
- Faulty Drive Clutch or Driven Clutch:
- Symptoms: Poor acceleration, cart “jerks” or shudders when accelerating, difficulty engaging gears, or the clutch makes unusual noises. Clutches allow the engine to spin at optimal RPMs before fully engaging the wheels.
- Diagnosis: Inspect the clutch springs, rollers, and bushings for wear or damage. This often requires removing the clutches.
- Solution: Clean, repair, or replace the faulty clutch component(s). This can be a complex job requiring specialized tools.
D. Other Gas-Specific Issues
- Improper Governor Adjustment:
- Symptoms: The cart feels limited in its top speed, and this limitation becomes very apparent on inclines where it just won’t “push through.” The governor is a mechanical device that limits the engine’s maximum RPM.
- Diagnosis: Inspect the governor linkage and settings.
- Solution: Adjust the governor according to manufacturer specifications (be careful not to over-adjust, as this can damage the engine).
- Low Engine Oil Level:
- Symptoms: Engine noise, overheating, reduced power, and potential engine damage.
- Diagnosis: Check the engine oil dipstick.
- Solution: Add engine oil to the correct level.

4. General Causes & Diagnostics for Uphill Power Loss (Electric & Gas)
Some issues can affect both electric and gas golf carts.
A. Dragging Brake System
- Symptoms: The cart feels like it’s constantly being held back, excessive heat from the brake drums/rotors, or a burning smell. This creates constant resistance, demanding more power.
- Diagnosis: Check if the brake pedal fully returns to its released position. Jack up the cart (safely) and manually spin each wheel to see if it drags.
- Solution: Adjust or repair the brake system to ensure the brakes are fully disengaging when the pedal is released. This might involve lubricating cables, adjusting shoes/pads, or freeing a stuck caliper.
B. Tire Issues
- Symptoms: Low tire pressure creates more rolling resistance, leading to reduced efficiency and perceived power loss. Uneven tire wear or incorrect tire size can also impact performance.
- Diagnosis: Check the air pressure in all tires using a reliable gauge. Visually inspect for uneven wear patterns or damage.
- Solution: Inflate tires to the manufacturer’s recommended pressure. Replace excessively worn or damaged tires. Ensure all tires are the correct size and type for your cart and intended use.
C. Vehicle Overload
- Symptoms: The cart performs fine when empty or lightly loaded but struggles significantly when carrying multiple passengers or heavy cargo on an incline.
- Diagnosis: Check your golf cart’s manufacturer specifications for its maximum recommended weight capacity.
- Solution: Reduce the load. Avoid exceeding the cart’s designed weight limits, especially when frequently driving on hills.
D. Transaxle / Differential Problems
- Symptoms: Unusual grinding, humming, or clunking noises from the rear end, fluid leaks, or inconsistent power delivery to the wheels. The transaxle (or differential) is the gearbox that transmits power to the wheels.
- Diagnosis: Check the transaxle fluid level (if applicable) and condition. Look for signs of leakage. Listen for noises when driving.
- Solution: Repair or replace worn gears, bearings, or seals within the transaxle. This is a complex repair best left to professionals.
5. Step-by-Step DIY Troubleshooting Guide (Safety First!)
Before you begin any diagnosis or repair, safety is paramount! Always follow these precautions:
- Disconnect Power (Electric Carts): ALWAYS disconnect the main negative battery cable first before working on any part of an electric golf cart’s electrical system. This prevents accidental shorts and shocks.
- Turn Off Engine (Gas Carts): Ensure the engine is off and cooled down before working on a gas cart. Disconnect the spark plug wire to prevent accidental starting.
- Personal Protective Equipment (PPE): Wear safety glasses and gloves.
- Stable Surface: Work on a flat, level surface. Use jack stands if you need to lift the cart.
- Ventilation: Ensure good ventilation, especially when working on gas carts or around batteries (which can off-gas hydrogen).
- No Smoking/Sparks: Avoid open flames or sparks around batteries or fuel systems.
A. Initial Checks (Universal for Electric & Gas)
- Accelerator Pedal: Ensure it’s fully depressed and returns freely when released.
- Tire Pressure: Check all tires; inflate to recommended PSI (usually found on the tire sidewall or in your owner’s manual).
- Parking Brake: Verify the parking brake is fully disengaged and not dragging.
- Load: Confirm the cart isn’t overloaded beyond its weight capacity.
B. Electric Golf Cart Specific Troubleshooting Steps
- Battery System Quick Check:
- Visual: Inspect all battery terminals and cables. Are they clean, tight, and free of corrosion? Clean if necessary.
- Total Voltage: With your multimeter, measure the total voltage across the entire battery pack. Record this.
- Under Load Voltage Drop: Now, safely (on a flat surface, consider chocking wheels or briefly lifting the drive wheels if safe to do so) apply a load (e.g., attempt to drive uphill, or briefly press the throttle with the brakes on). Measure the total battery voltage while under load. A healthy pack should not drop more than a few volts. A large drop indicates weak batteries.
- Individual Battery Voltage: Measure each individual battery’s voltage. If one or more batteries are significantly lower than the others (e.g., more than 0.5V difference), they are likely the weak link.
- Hydrometer Test (Lead-Acid): For lead-acid batteries, use a hydrometer to check the specific gravity of each cell. Consistent low readings across cells or significant differences point to issues.
- Solenoid Test: With the key on, press the accelerator pedal. Do you hear a distinct “click” from the solenoid (usually a cylindrical component with two large and two small terminals)?
- No Click: Check the small terminals for 12V (or pack voltage). If power is present but no click, the solenoid is likely bad.
- Click, No Power: The solenoid might be clicking but failing to make internal contact. Check for voltage across the large terminals with the pedal pressed. If voltage is present at one large terminal but not the other, it’s faulty.
- Controller Diagnostic Lights: Many modern controllers have small LED lights that flash codes to indicate faults. Consult your cart’s service manual to interpret these codes.
- Motor Temperature Check: After a period of driving or after power loss, carefully feel the motor casing. If it’s excessively hot (too hot to touch for more than a second), it could be overheating due to internal issues or prolonged overload.
C. Gas Golf Cart Specific Troubleshooting Steps
- Fuel System Check:
- Fuel Level & Quality: Ensure the fuel tank has enough fresh, clean fuel. Look for contaminants or unusual color.
- Fuel Filter: Locate the fuel filter (usually inline between the tank and carburetor). Is it visibly dirty? Replace it if in doubt.
- Fuel Flow: Disconnect the fuel line where it connects to the carburetor (safely, with a container to catch fuel). Briefly crank the engine. You should see a steady stream of fuel flowing. If not, suspect the fuel pump or a clogged fuel line.
- Ignition System Check:
- Spark Plug: Remove the spark plug. Inspect the electrode for wear, carbon buildup, or fouling. Clean or replace it as needed. Ensure the gap is correct according to your manual.
- Spark Test (Carefully!): Reconnect the spark plug wire to the plug. Hold the plug threads firmly against a metal part of the engine (not painted) using insulated pliers. Have someone briefly crank the engine. You should see a strong, blue spark. If no spark, investigate the ignition coil or ignition module.
- Air Filter Inspection: Remove and inspect the air filter. If it’s dirty, clogged with debris, or soaked with oil, it will restrict airflow. Clean or replace it.
- Drive Belt Inspection: Open the engine compartment. Inspect the drive belt (the larger belt connecting the engine to the transaxle). Look for cracks, fraying, glazing (shiny appearance), or excessive looseness. A loose or worn belt will slip under load.
- Clutch Check: With the engine off, visually inspect both the drive clutch (on the engine shaft) and the driven clutch (on the transaxle input shaft). Look for obvious signs of wear, broken springs, or excessive play.
6. Preventative Maintenance: Stop Power Problems Before They Start
Proactive maintenance is the best defense against uphill power loss and ensures your golf cart performs reliably for years.
A. Electric Golf Cart Routine Maintenance
- Battery Care is Key:
- Regular Full Charging: Always fully charge your batteries after each use, especially if driving on hills. Avoid letting them sit discharged.
- Regular Terminal Cleaning: Clean battery terminals monthly to prevent corrosion.
- Check Electrolyte Levels (Lead-Acid): For lead-acid batteries, check electrolyte levels every 2-4 weeks (more often in hot climates). Add distilled water only to cover the plates after charging.
- Equalization Charging: Perform an equalization charge (if your charger supports it) every few months to help balance individual battery voltages.
- Motor and Controller:
- Ensure proper ventilation around these components. Keep cooling fins clean and free of debris.
- Avoid prolonged heavy loads that can cause overheating.
- Wiring Inspection: Periodically inspect all electrical connections and wiring harnesses for tightness, signs of wear, or damage.
B. Gas Golf Cart Routine Maintenance
- Regular Oil Changes: Follow your owner’s manual for recommended oil change intervals (usually every 50-100 hours or annually).
- Filter Replacements: Regularly check and replace the air filter and fuel filter. A clean air filter ensures optimal combustion, and a clean fuel filter prevents fuel system issues.
- Spark Plug Maintenance: Inspect and replace spark plugs according to the manufacturer’s schedule.
- Drive Belt Inspection: Regularly check the drive belt for wear, cracks, or looseness. Replace it if it shows signs of wear or is slipping.
- Engine Fluid Levels: Check engine oil and coolant (if liquid-cooled) levels regularly.
C. Universal Maintenance (Electric & Gas)
- Maintain Correct Tire Pressure: Check tire pressure weekly. Proper inflation reduces rolling resistance and improves efficiency.
- Brake System Check: Periodically inspect brake pads/shoes, cables, and linkages for wear or sticking. Ensure brakes fully release.
- Avoid Overloading: Always adhere to your golf cart’s maximum weight capacity. Overloading puts undue strain on the entire drivetrain.
- Regular Cleaning: Keep your cart clean, especially the underside, to prevent dirt and debris buildup that can affect moving parts or block cooling.
- Follow Manufacturer’s Schedule: Always refer to your specific golf cart’s owner’s manual for detailed maintenance schedules and recommendations.
7. When to Seek Professional Help: Preventing Further Damage
While DIY troubleshooting can solve many common problems, some issues are best left to experienced professionals. Knowing when to call for help can save you time, frustration, and potentially costly damage.
You should contact a professional golf cart technician if:
- Basic Troubleshooting Fails: You’ve diligently followed all the DIY diagnostic steps, but the problem persists or you can’t pinpoint the exact cause.
- Complex Diagnostics Required: The issue appears to involve internal motor components, complex controller programming, engine compression problems, or differential issues. These often require specialized tools and in-depth knowledge.
- Safety Concerns: You notice symptoms that could compromise safety, such as brake failure, severe unusual noises, burning smells, fluid leaks, or unstable handling. Do not continue driving.
- Lack of Specialized Tools: You don’t have the necessary diagnostic tools (e.g., compression tester, advanced multimeter, specialized scanner for controllers) to accurately test certain components.
- Uncertainty or Discomfort: You’re simply not comfortable performing the diagnosis or repair yourself. There’s no shame in calling a pro!
- Warranty Issues: If your cart is still under warranty, attempting DIY repairs might void it. Check your warranty terms first.
Benefits of Professional Diagnostics:
- Expert Knowledge: Experienced technicians have seen it all and can quickly identify obscure problems.
- Specialized Tools & Equipment: They possess advanced diagnostic tools that can communicate with controllers, test engine compression, and perform load tests precisely.
- Correct Parts: They use genuine or high-quality replacement parts.
- Safety: Professionals ensure repairs are done safely and correctly, preventing further damage or safety hazards.
- Efficiency: They can often diagnose and fix issues much faster than a DIY approach, saving you time and hassle.
8. Troubleshooting Tools & Safety Precautions
Equipping yourself with the right tools and knowledge of safety protocols is crucial for any DIY golf cart work.
A. Essential Tool Checklist:
- Multimeter / Digital Voltmeter: Absolutely essential for diagnosing electrical issues (voltage, resistance, continuity).
- Battery Hydrometer: For checking the specific gravity of individual cells in lead-acid batteries.
- Battery Load Tester: Helps determine the overall health and capacity of a battery pack under load.
- Wrench Set & Socket Set: For loosening and tightening bolts and nuts of various sizes.
- Screwdriver Set: Phillips and flathead screwdrivers.
- Wire Brush & Terminal Cleaning Tool: For cleaning battery terminals and cable ends.
- Tire Pressure Gauge: For checking and maintaining correct tire pressure.
- Battery Terminal Puller (Optional): Makes disconnecting terminals easier and safer.
- Test Light (Optional): A quick way to check for power at various points.
- Compression Tester (Gas Carts Only): To measure engine compression.
- Spark Plug Socket (Gas Carts Only): For removing and installing spark plugs.
- Fuel Line Clamps (Gas Carts Only): To prevent fuel spills during line work.
- Jack & Jack Stands: For safely lifting the cart off the ground if needed.
- Flashlight/Headlamp: For illuminating dark areas.
B. Crucial Safety Precautions:
- ALWAYS Disconnect Power (Electric Carts): Before touching any electrical component on an electric golf cart, disconnect the main negative battery cable first.
- Turn Off & Cool Down (Gas Carts): Ensure the engine is off and has cooled down before performing any maintenance. Disconnect the spark plug wire to prevent accidental starting.
- Personal Protective Equipment (PPE): Always wear safety glasses to protect your eyes from battery acid, sparks, or debris. Wear gloves to protect your hands.
- Ventilation: Work in a well-ventilated area, especially when dealing with batteries (which can off-gas flammable hydrogen) or gasoline fumes.
- No Open Flames/Sparks: Keep open flames, lit cigarettes, and sources of sparks away from batteries and fuel systems.
- Avoid Short Circuits: Use insulated tools when working near electrical components. Be careful not to let tools bridge positive and negative terminals.
- Secure the Vehicle: If lifting the cart, always use sturdy jack stands on a level, hard surface. Never rely solely on a jack. Chock the wheels to prevent accidental rolling.
- Read the Manual: Always consult your specific golf cart’s owner’s manual and service manual before attempting any repairs. They contain vital safety information and model-specific instructions.
- Battery Acid Caution: Battery acid is corrosive. If it gets on your skin or clothes, immediately flush with large amounts of water. Have a baking soda/water solution ready to neutralize spills.
9. Glossary of Key Terms: Understanding Your Cart’s Components
- LSV (Low-Speed Vehicle): A legal classification for a small, four-wheeled vehicle (often a modified golf cart) designed to go 20-25 mph and permitted on public roads under specific regulations.
- Solenoid: An electromagnetic switch that acts as a relay, connecting the main battery power to the controller and motor when activated by the accelerator pedal.
- Controller: The “brain” of an electric golf cart’s power system. It regulates the flow of electricity from the batteries to the motor based on throttle input.
- Throttle Position Sensor (TPS) / Potentiometer / ITS (Inductive Throttle Sensor): A sensor that translates the position of the accelerator pedal into an electrical signal for the controller.
- Commutator: A part of a DC electric motor that reverses the current direction in the armature windings, causing continuous rotation.
- Governor: A mechanical device (in gas golf carts) that limits the engine’s maximum RPM, thereby controlling the cart’s top speed.
- Hydrometer: A tool used to measure the specific gravity of the electrolyte in lead-acid batteries, indicating their state of charge and health.
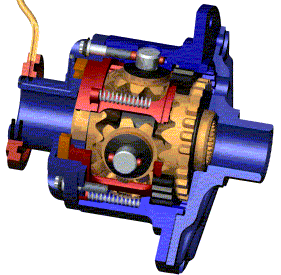
- Transaxle: A compact unit that combines the functions of a transmission and a differential, transferring power from the motor/engine to the drive wheels.
- Drive Clutch (Primary Clutch) / Driven Clutch (Secondary Clutch): Components in gas golf cart powertrains that engage and disengage the engine power to the transaxle based on engine RPM.
- DOT (Department of Transportation): A U.S. federal department that sets safety standards for vehicles, including tires and windshields for LSVs.
- NHTSA (National Highway Traffic Safety Administration): The U.S. government agency responsible for vehicle safety standards, including FMVSS for LSVs.
- FMVSS (Federal Motor Vehicle Safety Standards): A set of regulations issued by the NHTSA specifying design, construction, performance, and durability requirements for motor vehicles and their components.
10. Conclusion: Revitalize Your Golf Cart/LSV for Smooth Rides Uphill!
Uphill power loss in a golf cart or LSV is a common but almost always fixable problem. Through this comprehensive guide, you now have a thorough understanding of the myriad reasons that can cause this issue, whether they stem from the battery, motor, controller, fuel system, or drivetrain. Our detailed diagnostic steps and preventative maintenance strategies are designed to empower you to accurately identify problems, implement effective solutions, and maximize the lifespan and performance of your golf cart or LSV.
Remember, proactive maintenance is your best defense against most power-related issues. Regular inspections, timely replacement of worn parts, and adherence to manufacturer recommendations will ensure your golf cart remains in peak condition, effortlessly tackling both flat terrains and challenging inclines, delivering lasting enjoyment.
When you encounter problems that extend beyond your DIY capabilities, don’t hesitate to seek professional help. gmtlsv.com not only provides high-quality LSVs and modification parts but is also dedicated to connecting you with experienced, reputable technicians to ensure your vehicle receives the best possible care.
Take action today to revitalize your golf cart or LSV – make hills a breeze again!